
I have been building reports for QuickBooks Enterprise Businesses for quite some time. Almost 99.99 % of reports have been unique for each business. But there are very few reports that have helped more than one business. These reports are related to assembly and inventory management.
Effective inventory management is the lifeblood of any manufacturing business. It ensures smooth operations, timely order fulfillment, and customer satisfaction. However, determining accurate inventory quantities for assembly items on open sales orders can take time and effort. As a seasoned professional in building reports for QuickBooks Enterprise Businesses, I have witnessed firsthand the struggles faced by manufacturers in this aspect.
- Unique Challenges: Each business is unique, with its own set of assembly items, sales volume, and levels of subassemblies and inventories.
- Manual Effort and Errors: Business owners often hire employees and utilize tools like Excel to perform inventory calculations, but these processes are prone to errors and consume valuable resources.
- Expensive Third-Party Solutions: Some manufacturers turn to expensive third-party solutions that fail to provide the specific information they seek: the precise number of inventory items required to fulfill sales orders.
Manufacturing industries face challenges determining the inventory requirements for assembly items on open sales orders.
There could be many reasons for that. The most common ones are as follows:
- The staggering number of assembly items one company has.
- The sales volume.
- The levels of subassemblies and inventories have gone into assemblies.
All these factors make it a daunting and tedious task to determine the exact inventory quantities needed to build the assemblies to fulfill the order.
So, what happens when a manufacturing company cannot have this information at its fingertips?
Manufacturers need more accurate quantities of inventory required to fulfill assemblies on sales orders. These issues can have significant consequences for their operations and customer satisfaction:
- Overbuilding: Without precise inventory information, manufacturers may overbuild assemblies, resulting in wasted resources, labor, and increased costs. Excess inventory can tie up capital and lead to obsolescence.
- Underbuilding: Insufficient inventory quantities can delay order fulfillment, causing customer dissatisfaction, missed deadlines, and potentially lost sales opportunities. Manufacturers risk damaging their reputation and customer relationships.
- Inefficient Resource Allocation: Without accurate inventory data, manufacturers struggle to allocate resources effectively. They may allocate excess labor, machinery, or materials to compensate for uncertainties, leading to inefficiencies and unnecessary costs.
- Manual and Error-Prone Processes: Some manufacturers estimate inventory needs using manual calculations, spreadsheets, or outdated systems. These manual processes are time-consuming, prone to errors, and can hinder productivity.
- Limited Visibility and Decision-Making: Inaccurate inventory information limits manufacturers’ visibility into their supply chain and production processes. It hampers their ability to make data-driven decisions, plan effectively, and optimize operations.
- Lost Business Opportunities: Inaccurate inventory quantities can lead to missed sales opportunities and lost revenue. Manufacturers may need help to fulfill orders on time, resulting in canceled orders and dissatisfied customers who may seek alternative suppliers.
These challenges emphasize the critical need for accurate, real-time inventory information to support efficient assembly fulfillment. By addressing these issues, manufacturers can streamline their operations, reduce costs, enhance customer satisfaction, and gain a competitive edge in the market.
Any business may make such mistakes once or twice, but your business needs fixing if it starts happening now and then. I know one company that lost millions of dollars of candy orders from Walmart because they could not accurately determine the amount of sugar needed to fulfill the order on time.
This is where I come in. Having encountered numerous manufacturing businesses needing assistance, I have developed two reports addressing this critical inventory management challenge.
- Tailored Solution: My reports offer a tailored solution to the unique requirements of manufacturers, providing them with accurate information to streamline their assembly processes.
- Leveraging QuickBooks Advanced Reporting: I have harnessed the capabilities of this robust tool to generate reports that empower manufacturers to make informed decisions and optimize their inventory management.
Imagine the benefits of having the exact number of inventory items needed to build assemblies readily available at your fingertips.
- Increased Efficiency: No more overbuilding or underbuilding results in wasted resources or jeopardizes customer relationships and revenue.
- Cost Reduction: Optimize your resources by eliminating unnecessary inventory build-up or shortages.
- Improved Customer Satisfaction: Ensure timely order fulfillment and meet customer expectations consistently.
With these reports, you can unlock the potential for increased operational efficiency, reduced costs, and improved customer satisfaction. Say goodbye to the complexities of manual calculations and costly software investments that fail to deliver.
- Focus on Growth: My goal is to help manufacturers like you achieve seamless inventory management, enabling you to focus on growing your business.
- Power of QuickBooks Advanced Reporting: Join me on this transformative journey as we explore the capabilities of QuickBooks Advanced Reporting and its impact on your manufacturing operations.
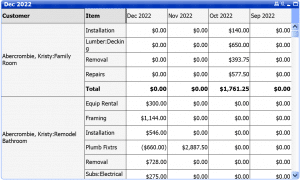
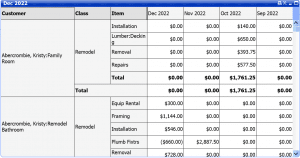
To show the workings of these reports, let’s assume that the company file has the following status of items.
| Assembly | Sub Assembly | Required Qty of sub-assemblies to build assembly item | Inventory component of sub-assemblies | Required Qty of inventory to build sub-assemblies | Qty on hand of Inventory Items |
| 2nd _lev_assm-1 | |||||
| Sub-Assm-1 | 2 | ||||
| Inv-1 | 2 | 10 | |||
| Inv-2 | 3 | 10 | |||
| Sub-Assm-2 | 3 | ||||
| Inv-3 | 3 | 10 | |||
| Inv-4 | 2 | 10 |
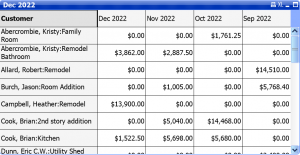
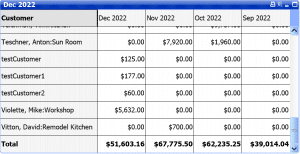
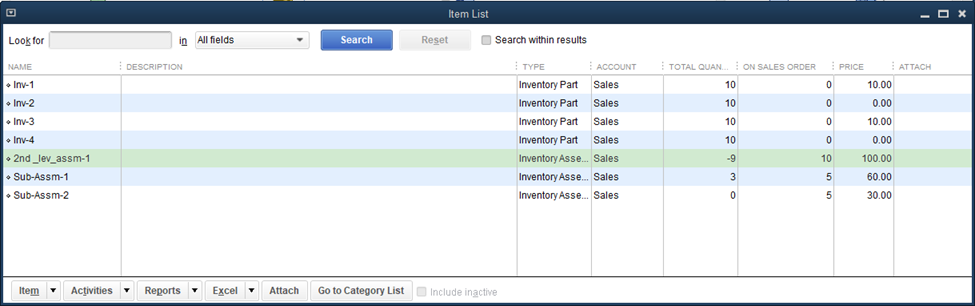
And here is the screenshot from QuickBooks Enterprise showing the Quantity on hand and Quantity on the sales order for each item.
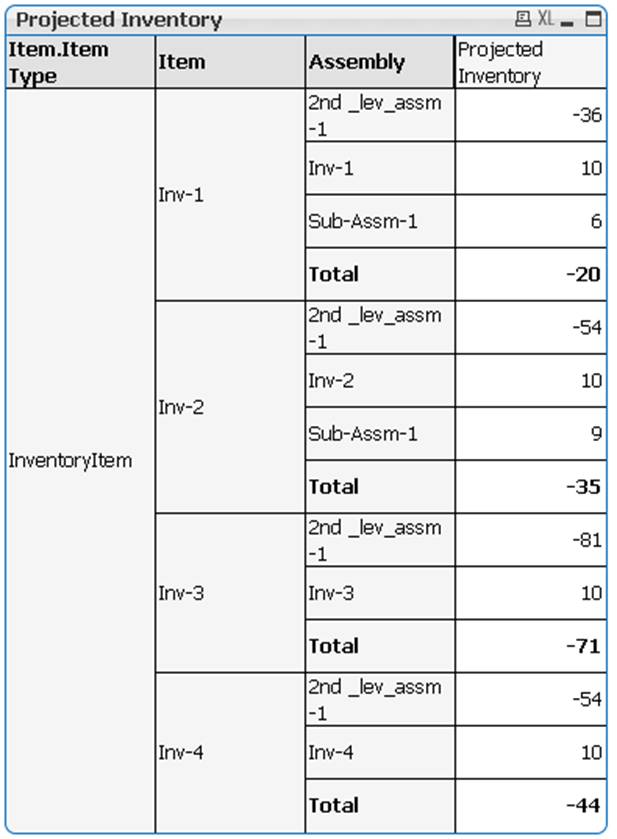
I refer to the first report as the Projected Inventory report, which shows the date below.
Projected Inventory Report:
Let’s pick one inventory item, Inv-1, to understand its logic.
Total Quantity of Inv-1 required to build:
- 1 unit of Sub-Assm-1= 2
- 1 unit of 2nd_lev_assm-1 = 4
- 1 unit of Inv-1 = 1
Quantity on hand of:
- 2nd_lev_assm-1 = -9
- Inv-1= 10
- Sub-Assm-1 = 3
The report output for Inv-1 is as follows according to this formula:
Quantity on hand X Total Quantity of Inv-1 required to build.
- 2nd _lev_assm-1 = -9 X 4 = -36
- Inv-1 = 10 X 1 = 10
- Sub-Assm-1 = 3 X 2 = 6
- Total = -36 + 10 + 6 = -20
The projected inventory for the inventory item Inv-1 is -20.
Quantity To Order Report:
The second report shows the data as follows.
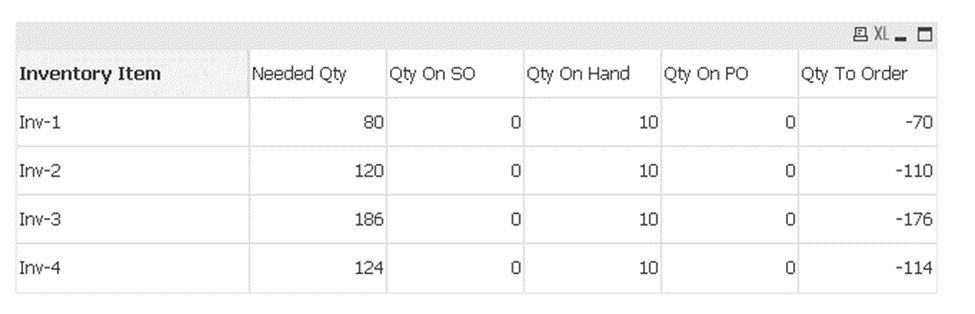
Let’s again pick one inventory item, Inv-1, to understand its logic.
The Needed Qty of Inv-1 for
- 2nd _lev_assm-1 = 10 [Quantity on sales order] – (-9) [Quantity on hand] = 19 X 4 = 76
- Sub-Assm-1 = 5 [Quantity on sales order] – 3[Quantity on hand] = 2 X 2 = 4
76 + 4 = 80.
Now, the company already has 10 Quantity on Hand for Inv-1. So, the Qty To Order is
[Qty on SO] + [Qty on Hand] + [Qty On PO] – [Need Qty] = -70
Now you know the exact Quantity to order for the Inventory item.
In conclusion, accurate inventory management is more than a goal; manufacturing businesses must thrive in today’s competitive landscape. The challenges of overbuilding, underbuilding, inefficient resource allocation, manual processes, limited visibility, and lost business opportunities highlight the urgent need for a solution that provides accurate inventory information.
By investing in the tailored reports I have developed, manufacturers can overcome these challenges and unlock the potential for streamlined operations, reduced costs, improved customer satisfaction, and increased profitability. Imagine having the power to make data-driven decisions, fulfill orders on time, and optimize your resources effectively. These reports offer a game-changing opportunity to take control of your inventory management and drive success in your manufacturing business. Make sure to keep accurate inventory quantities from hindering your growth and profitability.
Take the first step today and contact me to explore how these reports can transform your operations and position your business for sustainable success in the dynamic manufacturing industry.