
This month’s blog is about creating a customized list box in QuickBooks Advanced Reporting. Many times, we develop the report for a specific type of entity like inventory item or customer who has an outstanding balance or just income accounts.
In such cases, we need complementary filters to go along with the reports. It does not make sense to have an item filter with all types of items when the report is only for inventory items.
I am sure you would agree.
So, let’s learn about building a customized list box.
We will show you a few examples, and it can be extended to any extent. It all depends on your needs or your imagination.
Let’s start:
Click anywhere but on an object to open the right-click menu and select “List Box.”
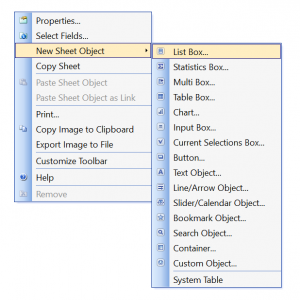
This window shows up.

Drop the Field dropdown and scroll till the end.
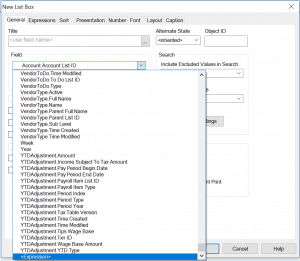
Choose <Expression>
The expression window will show up.

Here we can type the expression to customize the list box.
To show only the inventory items:
if([Item.Item Type]=’InventoryItem’, [Item.Full Name])
To show inventory and assembly items:
=if(match([Item.Item Type],’InventoryItem’, ‘InventoryAssemblyItem’), [Item.Full Name])
These are simple ones and you can even find them in the library section of QuickBooks Advanced Reporting.
Let’s try little more interesting ones.
Suppose you want to show Items of one type in a comma separated string when a particular item type is selected in another list box.
To do this, first, create a simple list box for “[Item.Item Type].
Now let’s build the more exciting item list box.
Go to the “List Box” menu and choose the expression from the drop-down menu.
Type this expression:
=if (GetSelectedCount([Item.Item Type]) = 1,
aggr(concat(DISTINCT [Item.Full Name], ‘,’), [Item.Item Type]), [Item.Full Name])
And voila, you have your nice list box ready.
This trick can be used in many scenarios.
Let’s see one more.
Suppose we want to show only those items for a customer which has been sold over a certain amount to that customer.
Create a List box for [Transactions.Customer Full Name]
And now create the interesting list box.
Go to the “List Box” menu and choose the expression from the drop-down menu.
And Type the following in the expression.
=if(GetSelectedCount([Transactions.Customer Full Name]) = 1,
if(aggr(sum({<[Transactions.Account Type]={‘Income’}>}
[Transactions.Amount With Sign]), [Transactions.Customer Full Name],
[Transactions.Item Full Name]) > 600,[Transactions.Item Full Name] ), [Transactions.Item Full Name])
This expression shows all items if there is no selection or more than one selection in the Customer list box. Otherwise, it will display only those items which have been bought by this customer for more than $600.
Watch the video to see it in action.